11ga
1” Rockwool
14ga
11ga
1” Rockwool
11ga
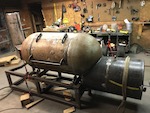
So 2”s on insulation and 7/16” of steel. Firebox door was 40ish pounds. I didn’t weight the cook chamber door but I’m sure it’s pushing 100#s.


Sent from my iPhone using Tapatalk
Moderator: TBBQF Deputies


 ...
...
spacetrucker wrote:Looks to good!!
its nice to see some one with the right tools, the job looks so much better I had to piece mill the things I did in the past. I'm very jealous
k.a.m. wrote:Completely Awesome build Sir. Nicely done.
I am a bit jealous of your shop oh the trouble I could get into there.
Return to “Custom Built Pits, Build Your Own Pit & Pit Modifications”
Users browsing this forum: No registered users and 5 guests